Friday, December 31, 2010

Wearable packaging

I changed the material on which the embroidered broach is going to be on. I am using a water soluble... so instead of using heat one has to put it under running water for it to disintegrate. The shape of the packaging can be changed and could be used for other products eg. blusher, compact foundation etc. to create a collection of these different broaches which the user can buy to collect.
 Different designs of broaches are going to be used on different packages. 

Sketch designs of product:


Renders using 3Ds Max and photoshop:


Make up packaging for TOLY

For our assignment we had to come up with four different ideas then choose one to continue on. 
They are still at a concept stage so we could gather feedback and ideas to develop our design.


I finally chose this design to continue on......... 

Friday, December 17, 2010

Museum of archeology Valletta: Group work: Part 4 cont.

MODEL MAKING

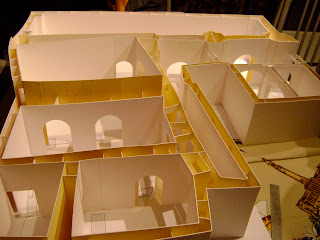
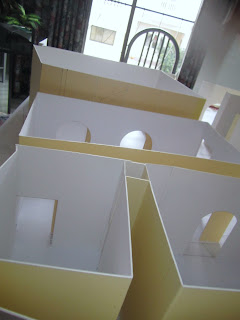
We moved a step further up by actually finishing sticking walls together and cutting out arcs and more arcs.  Now that the walls are finished we can start thinking about the lighting how to be placed and interiors.
We haven't attached the walls to the base yet for wiring that need to be done to pass through the lights in the model.


Thursday, December 16, 2010

Museum of archeology Valletta: Group work: Part 4

MODEL MAKING

We started building up the model scale 1:25 using Mount board and lots of glue :)

We started by cutting out the walls and arcs found in the museum. Till now the techniques we used were cutting, scoring and joining using glue. We didn't stick anything to the base yet because of the wiring for lights which will be inserted later on. At this stage we didn't connect the rooms together we built the rooms separately having each wall and arc cut out, making sure everything connects.


Museum of archeology Valletta: Group work: Part 3

At this stage we had to finalize our idea and put our designs fitting the actual plan and deciding about materials used:


Museum of archeology Valletta: Group work: Part 2 cont.

The Most important artifact found in this museum is the sleeping lady, so we dedicated one whole room just for the display stand of the sleeping lady. Currently it is placed in a normal display stand with the bottom part hidden even though the bottom part of the artifact is important and there are some engravings found. We designed a stand hanging from the ceiling with a mirror structure standing on the floor so that one can see the bottom part which will be reflected in the mirror and the top part as it will be placed at an eye level. 
LEDs will also be included in the stand to highlight the artifact and attract the attention of the viewers.

Sketches of the stand:


CAD drawing of the sleeping lady stand:

Another important factor in a museum is the way information about the artifacts is presented. We thought of using one of the rooms in the museum as a videography room so a feature can be shown to the viewers instead of writing paragraphs near the artifacts which they would have to read. this will also help the viewer's imagination to picture everything found in the museum during stone age times.

The Videography room will be made out of textile with a projector projecting on the textile.


Finally we thought of replicating the Fat lady and using the replica for the people to take funny pictures with and take something that will remind them of their visit:


Museum of archeology Valletta: Group work: Part 2

We agreed that something interactive with the viewer would give an experience. We noticed that the artifacts exhibited in the museum lost their value of appreciation when seen standing solo knowing that originally this stone formed part of a temple, so we came up with the idea to "rebuild" the temple using these artifacts in their original place. We did not want to replicate what there is in Mnajdra as it is pointless so we gave the temple a contemporary design mixed with the ancient original stones.


This is the technique we would be using to rebuild the temples using plywood. at first we weren't thinking of putting spacers between each layer but decided otherwise as it gives the design a sense of depth in the structure. 

This technique will also be used around the walls found in the museum creating display stands between layers.

First concept of temple using layers without spacers in between ( using 3D studio max):


Sketch showing how the walls will be connecting to the temple and the original artifact placed between the layers:


Test piece of differently shaped layers done with foam board:


Sketch of walls covered with layers:


Sketch of artifacts displayed between layers:


CAD drawings of display stands between layers:


Model of temple made out of watercolour drawing paper for the layers and foam board for the spacers:


We also came up with the idea of exhibiting the small exhibits separately to attract interest to the viewer because as they are currently displayed one can see all of them at a glance without appreciating each one separately. We designed perspex boxes coming down from the layered ceiling held by a rod each with a small artifact so that the view can see it from different sides and angles one by one. It also arises the element of surprise what to find in each box.
Each box is of different sizes depending on the artifact.

3D studio Max drawings of concept:


Model of display made out of plastic with artifact inside the box: